This post contains affiliate links. If you use these links to buy something I may earn a commission. Thank you!
A vacuum was the inspiration for my blog. Sounds ridiculous, right? A vacuum?
Let’s go back to last year, shall we?
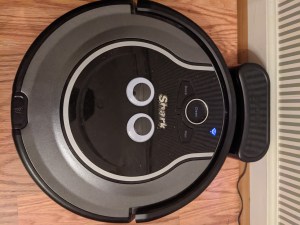
I had wanted a robot vacuum for years. Vacuuming and sweeping are not my favorite tasks, but my house was in desperate need of constant cleaning because of a cat and 2 kids. I just couldn’t justify the expense of buying one when I had so many other priorities. Fortunately, my sister saw one on Facebook Marketplace in her town for $75. I couldn’t pass it up as it was name brand, the Shark Ion RV750. I contacted the seller and arranged for pick up the next day.
That very night, I got home and plugged it in and worked to get it connected to my Wi-Fi. I named it Boston. Because it sucks (Go Yankees!). It worked for about 20 minutes, then began erroring out. I panicked. Did I spend money on a lemon? I reached out to the seller who advised it worked the night before she sold it to me. I have no proof otherwise so I did some research online as to what could be the problem. Turns out it was the suction motor. The main purpose of a vacuum and mine was dead. I am pretty sure I cried. I wanted this thing to work and I had just shelled out $75 of my limited funds.
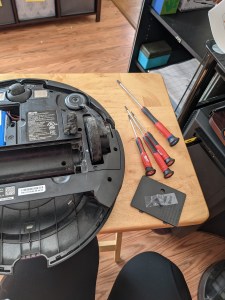
I decided I was going to fix it myself. I have zero experience with repairing electrical parts. I figured I’d find some instructions somewhere on what to do. YouTube to the rescue! I found a video of a person fixing my exact model of vacuum, with step-by-step instructions. I ordered the part I needed from eBay for $15 and while I was at it, I decided to order some new brushes and filters for it. The kit I ordered was from Mochenli and I found it on Amazon here. If it was getting fixed up, why not make it pretty too!
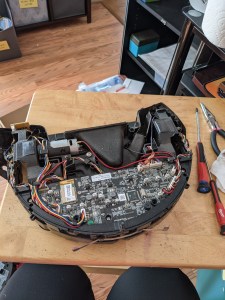
The motor was delivered about a week later and I got to work. I took it apart piece by piece as instructed by the video. Disconnecting the motherboard was intimidating as there were so many wires for this little piece of equipment. Finally, I got to the motor I needed to replace. It took a little finagling but I finally got the defective piece out and got the new one in. I reconnected all of the wires, cleaned out the inside and finally got it all put back together. I turned it over and hit that CLEAN button and IT WORKED! I was so excited I loudly cheered while home alone and texted some friends that I had rebuilt a robot vacuum.
And so, the idea of this blog came to be – sharing DIY projects I complete (intermingled with life as a single mom and cancer survivor) to show people they can tackle tasks that they may doubt they can. My main audience is single moms, but really anyone can do these things. I want to share my adventures through these tasks with you and hope you will join me on my journey.
